Netgear WiFi Extender to Starlink Connection: Everything You Need to Understand netgearextendersetup.com
Netgear WiFi Extender to Starlink Connection, is integral as in the evolving landscape of internet connectivity, Starlink has emerged as a revolutionary solution, providing high-speed internet access via satellite. To further extend the reach and coverage of your Starlink network, integrating a Netgear WiFi extender can enhance connectivity in areas with weaker signals or dead zones. In this comprehensive guide, we’ll delve into everything you need to know about connecting your Netgear WiFi Extender to Starlink Connection, ensuring seamless integration and optimal performance.
Understanding Netgear WiFi extender to Starlink connection brief
Starlink, launched by SpaceX, aims to provide high-speed, low-latency internet access to underserved and remote areas globally. Utilizing a constellation of satellites in low Earth orbit (LEO), Starlink offers a promising alternative to traditional terrestrial internet services, delivering speeds comparable to or exceeding fiber-optic connections.
Why Choose Starlink for Internet Connectivity?
Starlink, a revolutionary satellite internet service developed by SpaceX, promises to revolutionize internet connectivity, especially in underserved rural areas. By leveraging a constellation of low Earth orbit satellites, Starlink offers high-speed internet with low latency, making it an attractive option for users seeking alternatives to traditional terrestrial ISPs.
Netgear WiFi extender to Starlink connection: A Step-by-Step Guide
Now that you’re familiar with the essentials, let’s dive into the process of connecting your Netgear WiFi extender to Starlink:
- Choose the Right Location: Place your Netgear WiFi extender in a central location within your home or office, ensuring optimal coverage.
- Power Up the Extender: Plug in your Netgear WiFi extender and wait for it to power up. Ensure that it’s within range of your existing WiFi network.
- Access the Settings: Use a computer or mobile device to access the settings of your Netgear WiFi extender. This is typically done by connecting to the extender’s WiFi network and entering the provided IP address into your web browser.
- Configure the Extender: Follow the on-screen instructions to configure your Netgear WiFi extender. This may involve selecting your existing WiFi network and entering the password.
- Connect to Starlink: Once your Netgear WiFi extender is configured, connect it to your Starlink satellite terminal using an Ethernet cable. This establishes a seamless connection between your WiFi extender and Starlink’s satellite internet service.
- Optimize Performance: Fine-tune the settings of your Netgear WiFi extender to optimize performance. This may include adjusting the WiFi channel and signal strength settings for optimal coverage.
- Enjoy Seamless Connectivity: With your Netgear WiFi extender successfully connected to Starlink, enjoy uninterrupted internet connectivity throughout your home or office. Say goodbye to dead zones and lagging connections!
Netgear WiFi Extenders: Enhancing Coverage
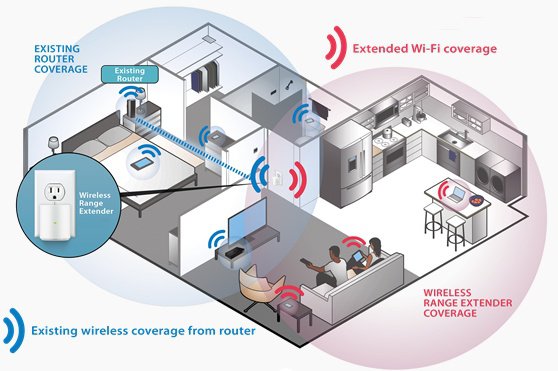
Netgear WiFi extender to Starlink connection, also known as range extenders or repeaters, amplify and extend the range of your existing WiFi network. By capturing the existing WiFi signal and rebroadcasting it, WiFi extenders help eliminate dead zones and improve coverage throughout your home or workspace.
Integrating Your Netgear WiFi Extender with Starlink
Step 1: Positioning the Extender
Begin by strategically placing your Netgear WiFi extender within range of your existing Starlink WiFi network. Choose a location that is central to the areas you wish to cover and ensure there are minimal obstructions, such as walls or furniture, between the extender and the Starlink router.
Step 2: Powering On the Extender
Once positioned, plug your Netgear WiFi extender into a power outlet and power it on. Wait for the device to boot up and initialize, indicated by LED lights on the extender.
Step 3: Connecting to the Extender’s Network
Using a WiFi-enabled device, such as a smartphone or laptop, scan for available WiFi networks. Locate the network name (SSID) associated with your Netgear WiFi extender, typically prefixed with “NETGEAR_EXT.”
Step 4: Configuring the Extender
Once connected to the extender’s network, open a web browser and enter the default web address provided in the extender’s documentation (mywifiext net). Follow the on-screen instructions to configure the extender settings, including selecting your Starlink WiFi network from the available options and entering the network password.
Step 5: Completing the Netgear WiFi extender to Starlink connection
After configuring the extender, wait for it to establish a connection with your Starlink network. Once connected, test the extended WiFi coverage by moving to areas previously experiencing poor connectivity. Verify that your devices seamlessly transition between the Starlink router and the extender without interruption.
Conclusion
By integrating your Netgear WiFi extender to Starlink connection, you can expand the reach and reliability of your internet connection, ensuring consistent coverage throughout your home or office. Follow the steps outlined in this guide to set up your extender efficiently and enjoy enhanced connectivity with Starlink’s high-speed satellite internet service.
Report StoryRelated Stories
- MATKA RESULT | SATTA MATKA | KALYAN MATKA | MATKA...
- I Love PDF – Your Online PDF Toolkit
- Discover Mindfulness-Based Cognitive Therapy at Mission Hill Psych
- \
- Harnessing Big Data for Enhanced Digital Marketing Strategies

- Optimizing Online Customer Journey to Enhance User Experience
- Buy # Norco # Online

- Buy # Oxycontin # Online
- Buy # Hydrocodone #Online
- Buy @ Oxycodone @ Online


